Showing posts with label beer. Show all posts

Wednesday, July 8, 2020

Wild Yeast Ideas

A few months ago, a friend of mine posted about trying to capture some "wild" (actually local, not necessarily wild) yeast to use in his bread making endeavors. I pointed him towards The Mad Fermentationist, hoping I might help him be successful. Of course, revisiting Michael Tonsmeire's work sent me down the rabbit hole... Where I discovered Sui Generis Brewing and http://suigenerisbrewing.com, which I also shared with my friend.

For years, I have dreamed of cultivating yeast from my own yard in order to brew beer. Between hearing about relatively low success rates and the amount of time I actually have been spending on brewing the last few years, the idea has gotten shelved almost as soon as my mind has wandered to the topic.

Although I had not yet recommitted myself to brewing, watching Bryan's videos at Sui Generis got me thinking about local yeast again... My new "small batch" mindset seems perfect for a little bit of yeast experimentation!

Several types of berries are currently ripening around my yard, and I have always considered these when thinking of trying to collect local yeast:
  • salmon berry (Rubus spectabilis - usually the first to ripen each year; very tart, even when ripe; rare to find fully ripened [red] berries - they are a favorite of the robins!)
  • thimbleberry (Rubus parviflorus - usually ripen following the salmon berry; red raspberry-like fruit; sweeter than salmon berry, but not super sweet)
  • trailing blackberry (Rubus ursinus - usually ripens in August, but is ripening early this year; the only blackberry truly native to my area; sweet and highly sought after, especially by wild berry snobs)
  • red huckleberry (Vaccinium parvifolium - usually ripens mid-summer; tart)
In late summer and early fall, I will also have access to:
  • Himalayan blackberry (Rubus armeniacus - ripens late summer; large, juicy berries - extremely sweet; considered a noxious weed, and ill-favored by wild berry snobs)
  • evergreen blackberry (Rubus laciniatus - ripens late summer; often intermingled with Himalayan blackberry; larger, seedy berries - tart; considered a noxious weed and not picked by anybody)
  • evergreen huckleberry (Vaccinium ovatum - ripens late summer/early fall; small black berries - sweet)
  • salal (Gaultheria shallon - ripens in late summer/early fall; mealy berries - not much flavor; I have seen robins get "drunk" from eating extremely ripe salal berries in the fall!)
  • Oregon grape (Mahonia nervosa - ripens late summer/early fall; small, purple berries - tart)
Tonight, I decided to get the ball rolling. I boiled up a batch of weak starter (1.020 w/ ~8 BU; 100g DME/200ml water). My father-in-law gave me his old 22-quart pressure cooker (in all its yellow enamel splendor, complete with the 1980 sales receipt!), so I made plenty of starter wort and canned it in pint mason jars.

Sunday, July 5, 2020

Jumping Back In!

Someone in the local homebrew club posted the deadline for the Western Washington State Fair's homebrew competition this past week. It's July, so like I posted the other day, it's kind of like my brewing new year... My wife knew that I was getting ready to brew, so she encouraged me to brew some beers for the competition.

Motivated by my new plan - to brew smaller batches - I dug out my brew log. As I thumbed through it, I jotted down a few notes. I figured if I was going to brew for the competition, I should start with some styles that had yielded past success. If lagers were going to be in the mix, I would have to get those cranked out first - so that is where I started. 

I decided on a Vienna lager and a German pils. The former was pretty easy, because that recipe has been pretty stable for me for a while now. However, when I was looking for a solid German pils recipe, I was only able to narrow it down to two - I could not figure out which one was the one I had liked better; I decided to try both... So I scaled those down, along with a dark mild recipe.

Armed with four prettty solid starting beers, I headed to my LHBS to purchase all of the ingredients...

Saturday, July 4, 2020

Brew Year's Resolution - in July (There's a Pattern)

Some people do New Year's Resolutions. Apparently, I do summer resolutions!

Here it is July again, and I find myself gravitating back to homebrewing. Again. I only brewed 5 beers in 2019, and 4 of them were brewed in the summer. I would like to say that this will change for the remainder of 2020 (which has obviously been a doozie!) and into 2021, but I say that every year...

I like planning - developing recipes. I like brewing. I certainly like drinking the results. But like so many other brewers, I hate cleaning! The setup and time for an all-grain brew day is a bit of a drag as well. I suppose that there are ways to make setup more efficient, which might shave some time off of that step. An extract or extract with steeping grains batch can reduce the brew day a great deal. There are no real shortcuts for cleaning, however.

This summer, I find myself analyzing brewing a bit differently. Along with the simplified analysis of what I like and don't like about brewing in general, I decided to think about what I like about drinking  beer. Above all else, I love the refreshing variety of flavor and style options. My wife is always asking me why I need so much beer; the answer is choice. I like to have choices!

Some days I want something light and refreshing - a craft lager or pilsner hits the spot (and because of hockey, I also always have some locker room beer like Rainier or PBR). Other days, I crave something hoppy - an IPA, pale, or session pale are there for me on those days. When I long for something dark and roasty - a porter or stout fits the bill. Besides simply matching the hankering in the moment, I also like to match the beer to the food I make.

Brewing that much variety in 5-gallon (or larger) batches is an undertaking. I do have a 4-tap keezer, but brewing and keeping 20 gallons of beer is kind of a big deal. When I used to brew with friends, it was easier; one year, a friend and I brewed over 300 gallons! Nowadays, however, it seems like I barely brew 20 gallons a year! Clearly, a different approach is in order...

In years past, I have mashed and brewed a bigger batch - to the tune of 10-12 gallons - and split it into two smaller batches. That worked well enough: more beer for not much more time on a brew day (running two burners for the boils). I have tried parti gyle batches, were I got a bigger beer and a smaller beer; I have made different beers from the same wort by varying hop charges and yeasts; and I have brewed very different styles from the same base wort by utilizing steeping grains. Each of these double batches got me two kegs. I'm not sure that any of these methods will get me brewing more often though.

Even if I were to go the double batch route, and fill all four of my taps, that might be 2 or 3 brew days, which is reasonable. Although four choices is technically quite a bit of variety - I could easily cover my bases with a lager, something hoppy, something darker, etc. - that's 5 gallons each; roughly 36 pints each keg. The novelty of those specific varieties often wears off before the keg is blown.

When I first begain brewing, doing extract batches on the stovetop, I often brewed smaller batches. Not only was it easier to manage, I also got to try my hand a lot of different styles! Back then, bottling 2-3 gallons of beer into some combination of about 24 bottles, 12 ounce and 22 ounce, was a lot less daunting task than bottling a full 5-gallon batch as well. After watching James Spencer brew up a one gallon batch on Basic Brewing Video, I even did a bunch of those batches, which yielded about a six pack of finished beer (that was a lot of work for six beers - I would recommend doing a 2-3 gallon batch over this method, unless you were conducting experiments).

These days, I have four 2.5-gallon kegs, which I have used for the occasional 1/2 batch (or when I brew something like a mild for a yeast starter). When I eyed those smaller kegs the other day, it got the gears turning... The smaller volume might get me over the "I'm kind of tired of this" hurdle. The smaller size also means that I can potentially fit more into my keezer - if I stack them; if I add some new taps, I could potentially double my choices (withiout having to drink 5 gallons of the same beer!)!

The prices have come down quite a bit on the smaller kegs (at least since I first bought mine about 5 years ago). I'm thinking it is probably worth investing in few more 2.5-gallon kegs. I already have quite a few 3-gallon carboys - more than enough to get a handful of beers going. Scaling recipes is a snap.

All of this has me a little bit excited - more excited than I have been about brewing for a while! My plan for reinvigorating my brewing is to go small! It is undoubtedly too early, given that I have not even begun brewing aything yet, but I am dubbing this the "brew-a-week" plan...

Sunday, March 12, 2017

Brewing Anniversary #10

When the holidays rolled around, I started thinking about brewing again. I only brewed 5 batches of beer last year, which is at least half as much as I would have liked... In fact, if it had not been for an event that I wanted to brew beer for, and a free grain bill provided by a friend, I probably would not have even brewed at all - and that is even more depressing!

As my thoughts turned back to brewing, I dug into books about beer, thought more deeply about each beer I was drinking (that's a lot of deep thinking!), and got caught up on brewing podcasts. As I listened, a couple marked anniversary episodes - most notably Experimental Brewing (1 year) and Dr. Homebrew (3 years). In the latter, the hosts always ask the guests how long they've been brewing... Which got me to thinking.

Growing up in the Pacific Northwest, I was aware of craft (micro) brews early on. My first was a Redhook Ale (not ESB, but their original ale) in the mid-80s in high school. It was certainly interesting, but kind of a palate shock for a teenager whose primary experience had been drinking Rainier and Heidelberg! During my first 4 years in the Army, I still drank mostly American lagers, but was exposed to lots of other good beer by fellow Soldiers who had been stationed in or traveled to Europe.

With this, my palate began to shift, and I came home to the Puget Sound to a proliferation of craft beer and grunge. My preferences included the aforementioned Redhook Ale, Pike Pale & IPA, and many other more flavorful and often hoppy beers. I made friends with the local beer distributor (who latrer went on to become one of the founding three partners at Elysian) at the Olympia Top Foods while in college, and he taught me a lot about beer as he tipped me off to new labels and offerings 22 ounces at a time.

In about 1992, I drank my first homebrew, brewed by a lifelong friend. The details have long faded from memory, but I do remember a reddish, hoppy pale ale. It probably was not super, but he had made it himself. At home. It was not super dry - there was considerable crystal malt character, and the hop character leaned on the bittering addition; all of this was very characteristic of styles in the late 80s and early 90s, much different than the dry, late-hopped pales we have today. In the late 90s and early 00s, I actually watched a couple of friends brew while I drank beer and did very little other than ask questions and stir pots.

The fruits of one of those brew sessions, a Fuller's pale clone, was enjoyed streamside after work one day in the spring of 2004, right before the birth of my second son... It was a little undercarbonated (the swing-top probably needed a new gasket), but it was delicious: bready malt flavor almost hidden by fresh hop character. After several years of thinking about it, I decided to take the leap. I asked for a homebrewing kit for my birthday in August.

We never got around to buying the kit that summer. I guess I underestimated how much work juggling work, a two-year-old, and a newborn was going to be. In fact, we still had not gotten around to it on my following birthday. And then my unit got called up to go to Afghanistan.

While deployed, the closest I got to beer was Bitburger Drive, their NA beer. While younger troops dreamed about cars and girls, I was dreaming about food and beer. I found out that one of the senior NCOs I had working for me was an experienced homebrewer (in fact, he confessed that he had run out of time before we shipped out, and he had a carboy of brown ale sitting in his bathtub during our entire deployment!). I grilled him for info every chance I got. At one point, I accompanied his team on a 6-week op (in the Korengal Valley - but that is s different story)... We talked a lot about beer and brewing. We were embedded with a CAV troop, and saw a lot of action during that month and a half, but our beer discussions kept us sane.

During one of those discussions, he recommended Charlie Papazian's seminal book, The Complete Joy of Homebrewing. He told me all I needed to get started was a kit and that book... I ordered it (along with The Homebrewer's Companion) the minute I got back to Bagram. I think I read those two books 2-3 times each during my last 3 months in-country! I already had several recipes picked out and the books looked well-worn before I had ever even brewed my first batch!

We spent Christmas (and New Year's) in Afghanistan, but my wife really wanted to celebrate the holidays when I returned. I put the brewing kit at the top of my gift list! And this time I got it...

Cooper's
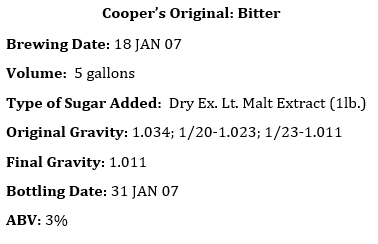
I was ecstatic when I unpacked my new homebrewing kit... A bucket with a lid, a carboy, a racking cane, some tubing, etc. along with an extract kit (Cooper's Original Series Bitter, which looks to have been replaced by "Real Ale") augmented with steeping grains, dry malt extract, and hops. I could not wait to get going! I think I brewed the very first weekend I was home...

I started like so many others, at that time at least, with a stove-top partial boil. I used a ceramic-coated steel canning pot. I steeped my grains until the water hit 165, then removed them and let them drain in a colander. I added my 3 lb. can of Cooper's liquid extract and 1 lb. of light dry extract and brought them to a boil. I followed the directions and added my hops when the homebrew shop owner's recipe said to do so. I put 2 gallons of filtered, cold water in the carboy and poured the hot wort through a colander and funnel into the bucket, then topped off with more filtered water. I added the Cooper's dry yeast sachet, and plopped the lid and airlock on the bucket.

I followed the instructions mechanically. I knew the basic process from reading The Complete Joy of Homebrewing (3x - remember?), but I had minimal understanding... Similar to when you begin cooking for the first time, it's more about the algorithm of the recipe than the process and how the ingredients fit together to make the final product. Plus, like any other process-oriented task, it takes going through it a time or two before the timing and flow feel right. Despite what Charlie Papazian says, I found it hard to "relax" avoid worrying, and I had no homebrew yet! (I don't even remember if I drank beer while brewing this one.)

I did take good brewing notes (the can of Cooper's extract came with a short data sheet in the instruction packet). After two days, I measured the gravity; two days later, it was stable, so I "racked to secondary for conditioning." Like most people 10 years ago, I conditioned my beer in secondary - in my case a glass carboy. After two weeks, I ended up with 5 gallons of (under-attenuated) bronze-colored ale, which I bottle conditioned in a combination of new 22 oz. and recycled 12 oz. bottles. I was so close, and yer I still had two weeks to wait!

By the time the bottles from my first brew were carbonated and ready, I already had two more batches under my belt. I chilled a few bottles in the refrigerator, but one bomber went into the freezer for the quick chill... When it came out of the freezer, the cap came off with a satisfying "pop-hiss." It poured beautiful and clear, almost amber, with a beautiful head and wonderful hop aroma. Casting back, it also smelled characteristically like a liquid extract beer... This was not, I have since learned, necessarily because it was an extract batch, but more a product of it being a partial boil extract batch.

My first beer, albeit less-than-perfect (under-attenuated, extract-y, etc.), was a success! My mother-in-law, who is not really a beer drinker, even liked it. I was excited at my success, and even more excited that I already had two more batches nearing completion. I became obsessed with homebrewing, reading all that I could find, messing around with recipe calculators and watching the effects of different ingredients and amounts on virtual beers, and brewing at least once each month. I gained a reputation with my friends... The guy that finally got me started homebrewing became a regular brewing partner (one year, we brewed over 300 gallons together), and he started coming to me for brewing advice!

Ten years have gone by quickly. My boys, who were first inhibitors to brewing, progressed on as helpers; they loved hanging around on brew day and helping me bottle (which was great, because I loathed bottling). Now they're old enough that they have a fairly thorough understanding of the science of brewing, and they like hanging out occasionally on brew day less out of admiration and youthful desire to be part of what Daddy is doing and more just to hang out for the company. It won't be long before we can brew together while sharing a couple of homebrews. I'm not brewing as much as I have at times in the past, but I'm no less passionate about homebrewing.

Cheers!

Thursday, March 19, 2015

"Found" Beer?

Can you call something "found" if you never knew it was lost in the first place? It was there all along, after all.

I've spent a few hours over the past couple of nights screwing around in the brew garage - listening to music, organizing small bits into storage drawers, putting away stuff that I finally got around cleaning... I even recorded a video for "Home Brew Wednesday" on YouTube (https://youtu.be/TfaZyKQWk6Y).

I'm not sure what possessed me to move some stuff at the front of the shelf where I cellar beer, but I discovered a long-lost gem at the back: one of my first Rye Pale Ales (based on the Can You Brew It Terrapin Rye). That episode aired in the middle of 2010, and I ordered the ingredients from Northern Brewer on my lunch hour at work, so that had to be in May or June of 2010.

I don't think I can adequately express in words the feelings I had when I made this discovery... Excitement? Elation? Anticipation? Amazement? Intellectually, I do know a couple of things about that discovery however... I loved that beer, and have loved it every time I have made it; and I was going to drink it. Soon.

I was already set for that evening as far as beer intake goes. Plus, I wanted to set myself up right for this tasting: clean palate, note taking materials, proper chilling, etc. So I placed it in the laundry room fridge, careful not to disturb the yeast at the bottom of the bottle.

It was remarkable how brilliant the beer appeared in the bottle: I could easily read 12 point print through the beer in the bottle! The ring of sediment at the bottom was further evidence of how time had cleared this beer. I went to bed longing to try this nearly-five-year-old beer! In fact, I dreamt about the tasting session - a surreal dream where several of us sampled the beer and discussed its merits and detractors...

The next day, there was a break in the weather, and I opted for the responsible choice and began my evening by mowing our lawn for the first time this year... That 2010 Rye Pale would have to wait. And then I had to make dinner. It was beginning to feel like I would never get to the beer!

With my tasting notebook and a purple fountain pen in hand, I finally settled in to pour my 2010 Terrapin Rye Pale clone at about 8:30 PM. I was excited and nervous at the same time! It was a great beer in its prime, but had it stood the test of time?

Appearance:
As previously mentioned, I could sense its brilliant clarity in the bottle - a careful decant preserved that. It poured a brilliant copper with a tall, white, rocky head that lasted and lasted - it simply would not dissipate. I'm sure the rye malt had something to do with that, and the fact that it had a good foam stand was a good indication that there was no contamination. The carbonation was lively, with tiny bubbles rising to the head. As I drank the beer, the head did not fade, and it left a heavy lacing on the glass.

Aroma:
Virtually no hop aroma remained - at least given the original hop schedule (over an ounce added at 10 minutes and flameout and 1.25 oz of Amarillo as a dry hop). There was a subtle spiciness in the nose - perhaps the rye, perhaps the Goldings or Fuggles hops? I picked up something else in the aroma, something elusive... I couldn't put my finger on it. The closest I could come was slightly vanilla-toffee, just a hint.

Taste:
The only hop character that remained was the overall bitterness - no definable hop character. In other words, I could no longer detect any of the distinct hop flavors: no Fugg

le, no Goldings, no Cascade, no Amarillo - no identifiable hop character. There was bitterness to balance the malt, even after 5 years. The malt had definitely moved forward as the beer aged - it used to be a hop-forward ale, with a spicy-rye malt undertone.

That ambiguous/fleeting aroma that I had a hard time naming was also present in the flavor, which is no surprise given how much smell factors into taste. I believe that aroma/flavor is oxidation-related, because I associate it most closely with bottled British ales, like those from Fuller's or Samuel Smith. It was a bit caramel-like - sort of toffee? It was not nearly as strong as in the aroma, but it was definitely there almost as a subtext... There was a bit of oxidative twang as well, but nowhere near enough to be unpleasant.

Mouthfeel:
I was pleased to find that the beer had not thinned over the half decade it cellared in the garage. I do believe that all of the hop character dropping out of the beer did affect the mouthfeel, because when it was fresh, between the rye and the hops, it had a strong medium mouthfeel, falling just short of chewy. Over time, it had now settled into the medium-light mouthfeel range, and the carbonation helped contribute to that as well.

Overall:
Wow. My excitement at the discovery of this beer was tempered with a heavy dose of apprehension: time is the enemy. Oxygen, contamination, temperature swings - any number of variables could have crushed this beer. It is nowhere near the original beer, but it held up OK. It was enjoyable. Not as zippy as the original, it did have the pleasant oxidative character I like in bottled imported British ales. The clarity, head retention, and lacing were amazing. I kind of wish I had discovered this bottle 2-3 years ago, because I can imagine a happy medium between the original beer and the 5-year beer, and in my mind's eye, that seems amazing!

"Lost" beer? "Found" beer? It is gone forever now. But the record of its tasting will live on...

Monday, March 2, 2015

Brew Day: Two Dry Stouts!

With Saint Patrick's Day a couple of short weeks away, I find myself without anything appropriate on tap! I always try to have something dark and roasty on - either a stout or a porter, o
r both! I am not the type who thinks of darker beers as winter seasonals... I can drink a porter anytime, and a dry stout functions just fine as a "lawnmower beer" for me.
Sláinte Mhaith - my dry stout

I have a standby (award winning) dry stout recipe that I brew at least 2-3 times per year. It is consistent and a pleaser for any fan of the style. I call it 'Sláinte Mhaith' (SLAHN-cha wa - Irish Gaelic for 'Good Health'). It is really just the recipe from Brewing Classic Styles (http://www.amazon.com/Brewing-Classic-Styles-Winning-Recipes/dp/0937381926) by Jamil Zainasheff (@mrmalty) and John Palmer with whatever uniqueness my system/process lends:
70% Maris Otter British Pale Malt
20% Flaked Barley
10% Roasted Barley
I use WY1098 British Ale as my yeast...

I have always loved stout - I was among the first people I knew to like Guinness (I will not admit how early). Like many brewers, I originally fell prey to the "more is better" thinking when formulating my stout recipes. When I sat down to write this blog entry, I looked back through my recipe binders and brew logs... There were TEN stout recipes (American and dry). Each was decent - I don't believe I ever made a terrible stout (I have made a few terrible beers though). But none of them was what I was looking for - thus the ten different recipes, none brewed a second time.

Then I listened to Jamil's Dry Stout  episode on The Jamil Show (http://thebrewingnetwork.com/shows/The-Jamil-Show) - the original one, not the Brewing with Style newer one... He talked about the simplicity of classic Dry Irish Stout. I brewed that recipe, which he later included in the book referenced above: it was exactly what I had been pursuing! I have been brewing that exclusively as my dry stout recipe ever since.

2015. The year is young, and I have been immersing myself in brewing media: Basic Brewing Radio/Video, the beer engine, Chop & Brew, Brewing Network... Was it time to brew a different stout? Should I put more than one stout on tap? An episode of Chop & Brew and an entry in the beer engine blog featured a Beamish-inspired dry stout - I had tried clones of Beamish in the past, but they had fallen short. This recipe, and the subsequent tasting on Chop & Brew, seemed compelling.

I talked through my ideas with my local brewery's tasting room manager (and former student), and he mentioned he had a nitro system that was not currently in use. What?! He offered it to me on loan! That iced it - I was going to brew both, and serve them both on nitrogen!

Brewed and ready for March 17th. No green beer here - only proper stout!

--------------------------------------------------------------------------
Slainte Mhaith
--------------------------------------------------------------------------

Category: Stout
                Subcategory: Dry Stout
                Recipe Type: All Grain
                 Batch Size: 5.5 gal
              Volume Boiled: 7 gal
            Mash Efficiency: 70 %
        Total Grain/Extract: 10.00 lbs
                 Total Hops: 2.0 oz

Ingredients
--------------------------------------------------------------------------
            7 lbs Maris Otter Pale
            1 lbs Black Roasted Barley
            2 lbs Barley (Pregelatinized Flakes)
              **2 oz East Kent Goldings (Whole, 5.00 %AA) boiled 60 minutes.
           Yeast: Wyeast 1028 London Ale

Notes
--------------------------------------------------------------------------
Mash @ 152°

Vital Statistics
--------------------------------------------------------------------------
 Original Gravity: 1.044
 Terminal Gravity: 1.009
            Color: 27.47 SRM
       Bitterness: 41.8 IBU
Alcohol (%volume): 4.5 %


** I actually shifted 10% of the hop bill to 10 minutes to match the Beamish-inspired recipe (for analoous comparison purposes)

--------------------------------------------------------------------------
Squeamish
--------------------------------------------------------------------------

                   Category: Stout
                Subcategory: Dry Stout
                Recipe Type: All Grain
                 Batch Size: 5.5 gal
              Volume Boiled: 6.5 gal
            Mash Efficiency: 72 %
        Total Grain/Extract: 9.25 lbs
                 Total Hops: 1.9 oz

Ingredients
--------------------------------------------------------------------------
            7 lbs Maris Otter Pale
            1 lbs Malted Wheat
         0.75 lbs Black Roasted Barley
          0.5 lbs American Chocolate Malt
           0.6 oz East Kent Goldings (Pellets, 5.00 %AA) boiled 60 minutes.
           0.4 oz Perle (Whole, 8.25 %AA) boiled 60 minutes.
           0.5 oz Hallertau (Whole, 4.50 %AA) boiled 60 minutes.
           0.2 oz East Kent Goldings (Pellets, 5.00 %AA) boiled 10 minutes.
           0.1 oz Perle (Whole, 8.25 %AA) boiled 10 minutes.
          0.15 oz Hallertau (Whole, 4.50 %AA) boiled 10 minutes.
           Yeast: Wyeast 1098 British Ale

Notes
--------------------------------------------------------------------------
Mash @ 152°

Vital Statistics
--------------------------------------------------------------------------
 Original Gravity: 1.042
 Terminal Gravity: 1.008
            Color: 28.44 SRM
       Bitterness: 39.1 IBU
Alcohol (%volume): 4.3 %

Sunday, March 31, 2013

Easter!

It was a beer-centric Easter. Big shock, eh?

Our tradition over the past few years has been to host the family - whoever can come - at our house for the big meal and festivities. Lately, this has dropped down to just my in-laws...

When it comes to food, they are probably my most critical audience (excluding the boys, whose taste preferences change seemingly week-to-week). This is not a problem (they have always liked everything I've ever made), but it is major consideration. The centerpiece of my Easter meal has become a home-cured ham.

My recipe has evolved over the years, beginning with a recipe that I found calling for a lot of dried dark fruits, salt, and tawny port. Then I discovered beer brine (thank you Sean Paxton at www.homebrewchef.com)! Note that at no stage did I actually smoke my pork (if you really miss that smokiness - which is often an additive rather than a process - you can either smoke your ham after it is brined, or use a beer that utilizes smoked malt like rauchbier or smoked porter) but technically speaking, ham is cured leg of pork...

This year, I forgot to buy my Dijon mustard (a critical ingredient in the "crust" of my ham). This forced another evolution this year (the recipe has stayed mostly the same the last couple of times)... I made a dry mixture of brown sugar, dry mustard powder, paprika, garlic powder, paprika, and savory instead of the usual mustard crust. And I opted for "slow and low" - 250* for 6 hours (covered for the first 5 hours).

Wow! The meat was the most tender ever! And it has spectacular flavor...

Here was our menu:
• Brined Mustard-Savory Ham (home-cured) w/ Gravy
• Scratch-made 3-Cheese Red Potatoes au Gratin
• Mashed Mixed Root Vegetables (3 types if sweet potatoes/yams, rutabagas, turnips, parsnips...)
• Steamed, Sautéed Basil Brussels' Sprouts and Kohlrabi

I accompanied my flavorful meal with a 750ml of Brasserie DuPont Vielle Provision - THE Saison.

Sunday, May 22, 2011

Non-Brewing Tasks

I wish I was brewing. But I need to recapture some fermentation space... I've got 15 gallons fermenting in the beer closet under the stairs, and another 5 going in the garage. I could easily fit a couple more carboys into either place (hybrids in the garage or ales in the house), or it would be nice to get a lager started.

Which brings me to the less fun non-brewing tasks related to making beer. There is always something to work on. Cleaning, organizing, racking, bottling, inventorying... I have delayed racking my finished beers (5 gal of Double/Imperial Red and 5 gal of Northern English Brown) because my kegs are not cleaned and sanitized. And I have delayed brewing my first lawnmower lager, because my new beer fridge had not been cleaned since I brought it home and my keezer needed a little interior wipe-down and reorganization.

So, instead of brewing more beer, this weekend was dedicated to some of those tasks that would enable me to brew more beer. Six 5 gallon kegs (and one more that is used for my kids' root beer). All in various stages of uncleanliness, ranging from absolutely filthy with god-knows-what dregs in the bottom to empty and rinsed but not really clean. I broke out the OxyClean, filled up a 40 qt cooler, and got to work. A couple of hours of elbow grease, and they were as shiny and clean as they were going to get!


Given the state of the kegs, I knew the beer lines were going to be a total loss, so I cut all the tubing off and threw it away. I scrubbed, then boiled all of the fittings (the beer-out connectors, the cobra taps) to make sure they were clean. Then I refitted them all with fresh new beer line in anticipation of new beer!

I also figured it was about time to press my new beer fridge into service... I got it a few weeks ago, and it is still not in use. I did clean out the freezer part right away, but then abandoned the project for other priorities. My wife would really like my hops out of the house freezer to make room for more food and she would really prefer if my yeast was stored someplace else as well. And it might actually be more my own fault when it comes to the yeast - I am really picky about what gets put into that refrigerator: nothing to smelly, nothing too hot, etc. (gotta take care of my yeast!).


My wife pitched in and helped me on the fridge cleaning (see what I mean?). The inside looks super, but there's not much we could do about the neglect on the outside. Maybe it is destined for a custom paint job? It's all plugged in and cooling down in anticipation of the goods!

Sunday, May 15, 2011

Planning Another Big Brew

I had a great time in April brewing with my Guard buddies; it really rekindled my brewing bug. I've been fairly active with beer-related stuff even when I haven't been brewing (but I have brewed 20 gallons in about 4 weeks time).

At drill this weekend, I pushed folks to get another brew date on the calendar. I knew that Kris needed to brew at least another 5 gallons for a wedding in July, so it was just a matter of 'when', not 'if'. We're going to shoot for either Memorial Day weekend or the weekend after drill (mid-June). Confirming that it was actually going to happen, the wheels started turning...

Kris told me that he was planning on brewing another batch of Bill's Citra Special IPA (www.olybrew.com). He brewed a batch about a year-and-a-half ago, and it was stellar. In fact, last spring when Black IPAs/Cascadian Dark Ales were getting a lot of press (and I was drinking a lot of different BIPAs), I began to think about how I would formulate my own Black IPA recipe. This recipe was the first one I thought of as a likely candidate: clean malt profile with a dry finish, and a bright hop character. What better way to contrast the darkness and tiniest hint of roast?

Also, Kris had inquired about brewing 10 gallons instead of 5, so that he could share one keg at the wedding and keep one for himself. Which is also great for me and the rest of our rag-tag brewing group, because that means we'll actually get some. It was then that it hit me - he could brew the Citra Special, and I could brew the Dark Side Citra! Then everybody could do the side-by-side, comparing the original recipe with my style-modified version of the same beer.

I guess I should start working on the recipe. This will have to be a pretty big yeast starter - 15 gallons at around 1.070 OG!

Saturday, May 7, 2011

Birthday Party Dry Hop


My Double/Imperial Red Ale (Bruise Bros) finished out right around the same time as my Redwings: good on the beer, bad on the'Wings. Time to dry hop it!

Weekends are always busy, and this was no exception. Mother's Day tomorrow, and today we did the family celebration of Brandon's birthday a week early, since I won't be around next Saturday on his real birthday. I had a bunch of stuff to do in the morning to get ready for company to come over, so I was just preparing my hops when folks started showing up...

My dad, who used to work at the Rainier Brewery back in its heyday (and whose grandfather was the business manager of the Horluck's plant for Sick's Brewing from the late-30s through the 60s), always takes an interest in my brewing despite the fact that he no longer drinks. As I weighed out the hops, sanitized marbles (to weigh them down), and shoved them into a hop bag, he shared how much he hated the smell of hops.

What? Are you crazy? Hate the smell of hops? He explained that he liked the smell as they were added to the wort, but he had negative associations with the smell of plain dried hops. It seems that when he first went to work at Rainier (he was 14 years old), one of his jobs was to move hop bales from cold storage to the brewhouse for the brewers.

Just like today, the hops were bundled into 100 or 200 pound sewn burlap bales; at 14 my dad probably did not weigh much more than 90-100 pounds since he weighed about 120 when he enlisted in the Marines at the age of 19. At any rate, he had to wrestle the bales out of cold storage, transport them using a hand-truck through the brewery up an elevator into the brewhouse. It was exhausting work, and he could not get rid of the smell. I guess I can see where his dislike comes from... I still like it though.

Monday, May 2, 2011

Finally! (Parti Gyle Complete)

In true Medius Nox Noctis form, I finished my parti gyle brew in the wee hours of the morning...

First of all, it is a crazy brewer who tries to brew multiple all-grain batches in one day. The brewer who thinks they can do three should not roam the streets of his free will. I will never do that again (even if my wife would let me)!

Besides time, the biggest challenge I faced with my parti gyle brew day involved brewing software. I do own BeerTools Pro, but I am usually too lazy to use it; maybe there is parti gyle formulation capability built into the software, but I wouldn't know. I primarily use the BeerTools.com website for my recipe formulation. It is not as robust or flexible as the BeerTools Pro standalone software, but it is quick and gets me in the ballpark for all my recipes; plus I am a "Gold" member, so I can store up to 256 recipes online.

The online recipe calculator has no parti gyle flexibility - or much in the way of sparge adjustments at all. It simply takes your grain bill and your recipe volumes and calculates out your gravities. This works great for the average batch or fly-sparged recipe. But for no-sparge or parti gyle? Not so much.

At any rate, I ended up pretty close to the predictions on the first batch (the Old Ale), which came in just over 1.100 OG with 5.5 gallons into the carboy. For the second beer, a Northern English Brown, I could not figure out how to make the adjustments in the interface to calculate the second runnings separately... I ended up just plugging in a completely new recipe, preserving the grain bill ratios and hop additions, but scaling it down to the actual gravity I pulled into the kettle.

I used some interesting yeast strains (Wyeast Old Ale Blend for the Old Ale, and Wyeast West Yorkshire Ale for the Northern English Brown) this time around. The Old Ale, dubbed 'The Reaper', will actually get racked into a secondary to let the Brettanomyces do its work; it will eventually go into bottles as part of my gift beer for the Holidays at the end of 2011. The Northern English Brown ('The Creeper') will be ready much sooner, and I can't wait to pull some pints off draft in a few weeks!

Thursday, April 28, 2011

More Yeast!


Like some evil genius in a classic horror movie, I like to grow my army of minions! My minions happen to be microscopic, but they still are powerful - they make my beer for me!

I posted previously about getting a late start on my brewing resolutions... I want to make sure I am brewing regularly, so that my process becomes smooth again. So this weekend - 3 batches! Today I started my yeast for a California Common, an Old Ale, and a Northern English Brown (these last two are going to come from the same grain bill - see my earlier post regarding parti gyle brewing).

I have never brewed a California Common, and I have never worked with the two yeasts I will be using on my Old Ale and my Northern English Brown. I have made two Old Ales in years past; the first one I spiced as a holiday beer, and it did not turn out very well (I under-pitched the first 5 gallons, which were so estery it was only good for mulled ale; the second five gallons were OK). I have brewed both Southern and Northern English Brown in the past, both from kits; these were OK as well, but I am striving for something better.

For my starters, I use the basic metric formula as spelled out in John Palmer's How to Brew: 100 grams of DME for each liter of wort (or 125 g of LME). For "normal" gravity ales (1.050 or less) I tend to just do 1L starters, and for higher gravities I'll do 2 or 3L. If I am brewing a lager or brewing for competition, I use Jamil's pitching rate calculator (www.mrmalty.com, also available on the Wyeast website) to be more precise.

I built myself a simple stir plate from plans available on the internet, and generally follow all of the sanitation instructions published by established homebrewing authors. I use 1 gallon jugs, which I discovered have a slightly convex bottom, making them useless on the stir plate. Eventually, I'll get myself some large Erlenmeyer flasks, but this is not preventing me from making decent yeast starters.

Wednesday, April 27, 2011

Planning My First Parti Gyle!


Without getting too far into the details of the brewing process, parti gyle brewing is a traditional (nearly, extinct, commercially at least) technique. Most modern brewers make one beer from one mash/grain bill. In parti gyle brewing, multiple beers are made from one mash/grain bill. With current brewing techniques, the first runnings (first drain of sugary water from the grain) are combined with the subsequent sparge (rinsing of the remaining sugars) to make one batch of wort, which will become one batch of beer when the yeast are done doing their thing...


With the parti gyle technique (originating in Scotland), the first runnings are used to make a bigger (stronger/higher gravity) beer, and the subsequent sparge(s) is used to make one or more smaller (less strong/lower gravity) beers. In its simplest form, the first runnings compose the wort for one distinct beer, and each subsequent sparge creates another distinct beer. This is evident in monastic and farm brewing: the first runnings went to create beer for the abbot or landowner; the second runnings were for the monks or guests at the farm; and the later runnings went to create table beer for the laymen & pilgrims or the farmhands.


Another parti gyle technique involves blending of the various runnings, with the strongest of the line of beers being 100% (or near 100%) of the first runnings, and the lowest gravity beer being mostly last runnings. One commercial brewery that still uses this particular technique is Fuller Smith & Turner (aka Fuller's) in the UK. Fuller's Golden Pride is an example of the strong end of their line, with ESB and London Pride somewhere in the middle, and Chiswick Bitter at the bottom of the beer-strength continuum. The same grain bill is used to brew them all, but each is blended at a different rate from the runnings off of the mash.


For those brewers that brew two distinctive, individual (not blended) parti gyle beers, there is further variation.

The brewer can choose a runoff volume ratio to determine how much wort is created for each batch. Common ratios include 1/3 first runnings to 2/3 second ruings, or 50-50. In the 1/3 to 2/3 ratio, the first third yields a stronger, richer wort in smaller volume which means less finished beer quantity; but it is higher in alcoholic strength and arguably the stronger flavor profile yielded by the combination of grains selected for the mash; the final 2/3 result in twice as much finished beer, but at half the strength and possibly less-pronounced or more subtle grain flavor profiles. The 50-50 method yields equal volumes, with less alcohol content and flavor differentials; the brewer still ends up with one stronger beer, both in alcohol and flavor characteristics, but simple chemistry and physics leads to a narrower extreme on both ends.


My first attempt will be a 50-50, just for ease of process. I will be making an Old Ale with the first runnings and a Northern English Brown with the second runnings (as opposed to a stronger Old Ale or Barleywine with the 1st runnings and a mild or or ordinary bitter with the 2nd runnings if I did the 1/3 to 2/3 method). Old Ale is a big English style ale, characterized by an elevated level of sweetness and alcohol. Originally, these beers were aged significantly before being drunk, but these days most commercial examples are either not aged, or a blend of aged and newer beer. If you can get your hands on them, good commercial examples include Theakston Old Peculier or Greene King lde Suffolk. Northern English Brown is a malt-balanced ale, with low hop bitterness and minimal hop aroma. Commercial examples include Newcastle Brown Ale and Samuel Smith's Nut Brown Ale (I am hoping for more of the Samuel Smith's version).


I have two special, limited edition Wyeast yeasts for these beers. The Old Ale Blend (WY9097) is a blend of alcohol-tolerant, dry English ale yeast with a bit of Brettanomyces (a different, non-beer yeast); the ale yeast will do a good job fermenting down the beer with a nice English character for starters, then the Brettanomyces will take over, fermenting some of the sugars that were unfermentable by the ale yeast, adding some rustic aged characteristics to the finished beer. For the Northern English Brown, I am using West Yorkshire Ale (WY1469), which should help emphasize plenty of the malt flavor and character, and finish dry and balanced with some nutty/fruity esters. We'll see.

Saturday, April 23, 2011

The Pride of Sharing


I enjoy cooking. I enjoy making beer. They are both similar in process and creativity. But they are similar in another way as well...

If I am alone, I am unlikely to cook anything fancy. In fact, a sandwich or something simple and utilitarian is my most likely "dining alone" meal. Why? I'm probably not worth the effort. Seriously, for me a big part of the reward of cooking a good meal is the enjoyment of those who are eating it. I love it when people like my cooking. It makes me feel good. Unfortunately, a longer commute has relegated me to mostly weekend cooking and an occasional slow cooker meal during the week...

Making beer provides me with a similar experience (although I have absolutely no problem enjoying beer alone!). I love to share and talk about beer - it is fun and enjoyable. But it is even more rewarding when it is beer that I made.

It is funny, but the same people who have grown to expect great cooking from me are still surprised by my homebrew. I think that beer is one of those mass-produced commodities from which most Americans have become detached in terms of production. Like french fries - my mom used to make homemade french fries, but now people are shocked and amazed if you made them from scratch. Pretty soon, bread will be the same way.

With beer, there is some notion of magic or mystery since most people don't understand how it is made. I think the collapse and consolidation of the brewing industry in the latter part of the 20th century helped foster this notion. Without local small breweries, beer was produced off on the outskirts of society, arriving magically on the shelves of grocery store coolers. The brewing process was lost in the folds of imagination.

I think that is changing, given the number of local breweries springing up around the country. In Kitsap County alone (a rural/suburban county on the western shores of Puget Sound, a ferry ride away from Seattle), we now have at least five craft brewers - and three of them opened within the last two years. So, given that people (in places like Western Washington, Oregon, and California at least) have access to fresh, local beer, why are folks still surprised by homebrew?

I don't think they are surprised by the variety, freshness or quality anymore. I think they are still surprised because they don't understand the process. I love it when the conversation turns from "Really - you made this?" to "What kinds of beer do you make?" then finally to "How do you make it?". That's the money question. Demystifying the process.

I am fortunate, because nobody has begun to take my homebrew for granted the way they do my cooking.

Brewing is rewarding for me, of course. I mean, I get to make whatever kind of beer I want. I control the process from ingredients and recipe, all the way to the finished product. And it is beer - five gallons at a time! But as rewarding as it is for me myself, it is all the more rewarding when shared with friends.

Saturday, April 9, 2011

The Hops Are Coming! The Hops Are Coming!


Well, they're sprouting up at least. I noticed right around the end of March that there were some green nubs poking up through the soil in my hop containers - and a little over a week later, they all have significant growth!

I got the twine hung, so that the bines have something to train along before they go too crazy. Last year, I had 3-4 twines running up at an angle to one central point (a 15' piece of rebar). This worked well (and my wife was happy with the aesthetics), but once the bines reached the top in around August, they got all tangled up. This made it more challenging to keep the hop sorted out when I harvested them.

This year, I moved the two pieces of rebar to the extreme ends of the area planted by hops. I strung a piece of aluminum wire horizontallybetween the two pieces of rebar (this is similar to what the hop farms in Yakima do). I tied each piece of jute twine to a zinc washer, then threaded that onto the aluminum wire. This will make harvesting the hops way easier, and will keep the bines from getting tangles since they will grow straight up this year.

Judging from the density of the shoots sprouting up in each container, this will probably be the last year that I can keep the rhizomes growing in them. I started the rhizomes in containers last year, because I was not sure if this location was going to be conducive to the hop growth - clearly it was, since I got well over a pound of hops in the first year! I actually had begun preparing the soil at the foot of the raised beds so that I could move the hops this year, but by the time I got around to it, they were already coming up. I didn't want to risk it, so I'll move them for next year.

I am excited to see if my yields increase this fall!

Monday, December 6, 2010

Feast or Famine... (AKA November Redux)

I think my last post was in June. Even before that, the posts were intermittent at best! There was not a ton to report as far as my usual topics go, though. Is it too early for New Year's Resolutions???

The looming Holiday Season jump-started my brewing again. Most tasks may be "like riding a bike" in terms of never truly forgetting how to do them, but brewing, like driving a manual transmission, is one best served by regular practice! It is not rocket science, but there are a lot of steps. The beer is better when things go smoothly.

Since I am a "yeast starter" guy, I need to start my timeline a couple days early in order to brew. I'm no stranger to brewing through the night after family stuff is done (hence the name of this blog), but planning is still necessary. Since I had a list beers I was planning on brewing in the late summer and early fall, most of my yeast was getting tired viability-wise. This added a few more days to the brewing timeline, because I had to step-up my starters.

Nevertheless - I finally got my Dunkel Weiss going a few weeks ago... It was my first Bavarian-style weiss beer, having only brewed an American Raspberry Wheat (for my wife) previously. I have heard all the stories about the vigor of this yeast (the Weihenstephan strain - WY3068), but was still not prepared! This yeast was relatively fresh, so I did my usual 2L starter.

Geyser is probably not the appropriate term, since it did not hit the ceiling... But I came home from work to find the foil off the carboy, and a steady flow of krausen flowing down the entire circumference of the carboy. I am glad that the carboy was in a milk crate and on a towel (and likewise glad that I found this before my wife)!

I am no rookie when it comes to blow-off mishaps. In fact, my wife has called me at work and even threatened to cut off my brewing of ales (fermenting in the house) as a result of vigorous fermentation accidents. Fearing the loss of hobby privileges, I have adapted my techniques to try to avoid these yeast-caused problems...

When I ferment in a 5-gallon vessel, I always use an appropriately-sized blow-off tube which flows into container of ample volume (2L minimum, emptied before I go to work!). Preferably, I ferment in 6-gallon vessels, and never put more than 5.5-gallons of beer into it. It has been quite a while since I had more than a couple tablespoonfuls of yeast krausen escape containment, which may be why this massive flow was such a surprise (FYI - keep your dog away if you expect that your yeast is making a break for it! I had to drag my lab away from licking up the expelled yeast!). I put about 5.25 gallons into the 6-gallon fermenter.

Having not been caught by my wife, I quickly changed out the towel, and took the vigorous yeast activity as a good sign (while at the same time dreading the future carboy-cleaning task). I did a little triage, and the fermentation was back on track. Then came the Thanksgiving-week storm... If you don't live in the Pacific Northwest, you might have missed it - but we got 4" of snow in the Puget Sound region, accompanied by high winds and power outages.

I pretended like I was concerned for the comfort of my family (OK, I was a bit concerned) as I kept the wood stove gong 24-7. I was worried about my 4 yeast starters and my Dunkel Weiss, and needed to maintain a suitable ambient temperature in the face of no power and sub-freezing outdoor temperatures! I dutifully kept logs on the fire, and occasionally sneaked a peak at the LCD carboy thermometers, aiming to keep their temps above 60° at least. I think I managed OK.

I mentioned the Holiday Season as a motivational factor. Since the very first year I homebrewed, I have given beer as gifts. At this point, I think that my friends and co-workers would be disappointed by anything other than beer (this is quite a compliment). And at our National Guard Holiday Party, it is a foregone conclusion that I'll provide baskets of homebrew for the family support auction. If you are a homebrewer, you know what I'm talking about - the list of people who want your beer grows...

By my reckoning, demand was going to exceed supply... I took stock of on-hand supplies and proven recipes. Next up: a partial-mash ESB that has become a bit of a stand-by! The partial mash was carried out in a 2-gal beverage cooler, and added to a the kettle with some DME for a full-wort boil. I love this recipe (based on somebody's take on Fuller's ESB - but in my mind, not really a clone), and like to brew it 3-4 times a year. It has also become one of the beers that I like to use to check out different yeasts... This time around I went with NW Ale (WY1332 - believed to be from Hale's in Seattle). At this point, it is probably very close to being done...

On the Saturday after Thanksgiving, I loaded up the wagon with brewing equipment and supplies for the trek to Seattle for an annual memorial brew day. I lost the best friend (a homebrewer) I ever had - the closest thing I had to a brother - on the 23rd of November, 2003 in Iraq; a family of lifelong friends lost their homebrewer almost two years ago on Superbowl Sunday (his birthday is in November)... We decided to make a commemorative tradition on Thanksgiving Weekend. This was our second year (last year we brewed a delicious Winter Warmer and a Robust Porter)...

Ferry traffic was crazy, and I arrived late. But things went fairly smooth for only my second brew session in months! I brewed a Rye Pale Ale, based on the Terrapin Rye clone on the Can You Brew It show on the Brewing Network (http://www.thebrewingnetwork.com/shows/597); Ben brewed an Amber Ale from Brewing Classic Styles. We drank the last bottles of each of our beers from last year, video skyped with our missing brew partner who's teaching in Viet Nam, and enjoyed the good company of family.

I missed the mark this past weekend... Several of my beers were not yet ready, and I needed to fill two raffle baskets. I have been lagering a batch of Classic American Pilsener for my Mom - but at least 24 bottles of it absolutely needed to find its way to her this time around (this is a long and entertaining story in itself). In my keezer, I still had a few gallons of beer left from late-summer brewing: a little over a gallon of Düsseldorf Alt brewed for a friend's retirement and a little over a gallon of an Imperial Rye IPA (a modification of Denny' Rye IPA). I counter-pressured this into bottles. I also had a few bottles of Pumpkin Ale (an attempt at an Elysian Night Owl clone, tasted and preferred on the Can You Brew It show - to the best of my knowledge, the only non-show homebrew tasted and discussed on the show) left from last winter. So, the baskets looked as follows:
  • 2x 22oz Dunkel Weiss
  • 2x 12oz Pumpkin Ale
  • 1x 12oz Classic American Pilsener
  • 1x 22oz Düsseldorf Alt
  • 1x 22oz Imperial Rye IPA
After recovering from the power outage, I had fallen a bit behind, so I pulled some near all-nighters getting caught up leading into this weekend... Including a marathon bottling session where I bottled over 12 gallons of beer over Saturday night in order to have the beer baskets ready for Sunday. Maybe my timelines need a bit of adjustment?

I will definitely be in good shape for the rest of my bottled gifts leading into the holidays... I've already got the remainder of my bottled Dunkel Weiss and CAP, and should be adding the ESB and Rye Pale Ale shortly. I've got several recipes on deck, including a big batch of Pale Ale for a lautering experiment proposed by BYO magazine and Basic Brewing Radio. I'm torn between ending the year in a brewing flourish, still coming well short of my 100-gallon goal, or saving most of my brewing plans until after the New Year in order to get a jump on 2011's goal!

Wednesday, June 2, 2010

Breakfast Gives Rise to a Fun Idea!

So... My oldest son (7-1/2) was eating his breakfast, and he was reading the cereal box as he often does. I was pouring a cup of coffee when he shouted out, "Dad! This cereal could be beer! It's got wheat, malted barley, and yeast in it!"

"You must be so proud," my wife said to me somewhat facetiously.

Actually I was. I read the cereal box while sipping my coffee... Whole grain wheat flour, wheat four, malted barley flour, salt, dried yeast, soy lecithin. Hmmmm... "You know what buddy, you are absolutely right!" I replied. "What ingredients are missing?"

"Just the hops, Dad."

Yep. I am proud. I explained to him that the yeast might not actually be viable, since it may have been cooked as the cereal was processed. When he asked me why it was in there, I explained that yeast has some nutritional value, including vitamin B. I could see the wheels turning in his young head.

"So... Beer is kind of like food," he finally said. "Could you actually make beer out of Grape Nuts?"

After some thought, I replied, "I don't see why not... The only ingredient that would have a negative affect, as far as I know, is the salt."

After the disapproving glances and pointed glaring, my wife's face formed into a devilish grin. My first thought was how much trouble I was going to be in now... "You know what you should do? You should make up a batch of beer for the family camping trip, and call it 'breakfast beer'. Then when everybody likes it and it's gone, you can tell them you made it from cereal - they just drank their Grape Nuts!"

This actually sounded like a fun way to do it... I have read many forum posts about Grape Nuts beer, and beer from cereals in general. But for me, this beer would have a back-story!

I have begun thinking about the cereal, trying to get a handle on how much extract I can expect... It is unlikely that I could steep it and expect to get much more than the malted barley out (I would assume that this would be a bit like crystal malts). I am thinking of trying a small cereal mash added to a normal mash with some pale malt. I might also just try adding it into the mash with some pale malt. The difference in extract probably depends on how much of the cereal is actually wheat - it is not listed as malted wheat. Maybe it is negligible? Maybe I could make do with the simpler mash? That's why I want to try both methods...

Hop Trellises

In a recent post, I lamented the loss of my established hops due to a poorly executed move. In that same post, I also spoke of planting my new rhizomes. As I eagerly awaited bines to sprout, I contemplated trellis possibilities...

At my old house, I strung twine from my roof down to the ground - this gave me about 10' vertically. At my new place, the hops are planted away from my house in an area of raised garden beds. The trellis issue presented two problems. Of course, the first problem was the trellis system itself -what was I going to do? Secondary, and possibly more importantly, whatever trellis system I decided upon had to meet my wife's approval, since she is in charge of the aesthetics of the garden area.

What I really wanted to do was weld up a sturdy, permanent trellis... I felt that the unfinished steel would rust up nicely and complement the rustic wood of the raised beds and fenceposts. My wife thought that this plan would result in a "rusty monstrosity" which would undoubtedly be an "eyesore." (the quoted parts are her actual words) Likewise, any wooden trellis structure was likely to be a visual distraction.

I reluctantly concurred, putting off any truly permanent construction until next year when I plan on putting the hops into the ground (or at least planted more permanently).

In the end, I opted for simple. Material-wise I purchased two long 5/8" pieces of re-bar, 4 u-shaped 1/2" conduit brackets, two 1" screw eyes, 2 worm-drive hose clamps, and a spool of natural fiber twine. Planning-wise, I did not consult my wife (this simplified things greatly).

I used the hose clamps to fasten one of the screw eyes to the end of each piece of re-bar; tightening down the clamps as tight as they would go (along with a little bit of shaping of the clamp strap) added a sturdy circular eye to the 'top' of my trellis rod. Next, I test-fit the conduit brackets, and bent them to insure a secure and stable fit. I began by fastening only one side of a pair of conduit brackets for each trellis rod to the end boards of a raised garden bed. Before I mounted the re-bar to the garden box, I threaded 4 strands of ~20' of the natural twine through the eye at the top (this way, I avoided having to climb up a ladder to do that later). Finally, I fitted the re-bar into the conduit brackets and finished screwing them in. This resulted in a trellis that will be plenty sturdy for the hop bines, and hardly noticeable in the garden area.

Monday, April 5, 2010

New Beer Annex: The Acme, Tacoma


I look forward to drill weekends... Not because I love donning the uniform, not because I love the Army, but because I love the guys I work with. I truly look forward to seeing them every month. One of the highlights is our Beer Club (this is a totally lackluster and uncreative name)... We get together and drink beer well into the night. It often becomes a prideful contest to see who can last the longest, but it is mostly about drinking and talking about good beer.

At the Holidays, my homebrew baskets for the unit fundraiser raffle have become legendary. People start asking if I will be providing baskets about three months in advance! I also usually provide kegs for barbecues, picnics, and special events after drill. I have rallied quite a bit of interest in good beer and homebrewing through such beer diplomacy... Over the past year, our gatherings have grown and grown, often attracting upwards of 20 folks; likewise the number of homebrewers in our midst continues to rise.

However, our unit moved from a location we had occupied for the past five years. We had established drinking routines: either drinking in-house with a variety of offerings brought in by revelers or a walk to the local dive bar just off post. Faced with a new location, one which we share with many other units (visibility is the enemy of discretion), all eyes were on me for a plan.

Google is my friend, even if many of the sites I wanted to visit were blocked by government internet filters! Using Google Maps, I was able to locate several local haunts within 15 minutes walking distance. The walking distance part is non-negotiable for me, because I don't want anybody driving after we've been out drinking. Several of the potential establishments were also music venues, so they were going to require a cover and be fairly crowded. We decided on a place, which from all appearances looked to be a good dive replacement, that was only 4 blocks away!

The Acme Tavern in Tacoma was two blocks north and two blocks east of our armory - can't beat convenience! And it was not a dive at all! They strive for the dive feel - shunning any trendy embellishments. Tables, chairs, bar games, a jukbox, pounders of Rainier and PBR, taps of American Macro-swill... And 4 local micro/craft taps! The bar tender was a super guy, and the local bar flies were friendly and welcoming.

We filled the jukebox full of quarters and waxed indecisive about what we wanted in the music queue... We drank four pitchers of Odin Brewing Co.'s Odin's Gift, and were sold on our new beer annex! If you haven't had a chance to try any of their brews, their tasting room is open most Friday afternoons... They are located in Seattle, near the Museum of Flight (9130 15th Pl. S. Suite F, Seattle, WA, 98108).

Odin's Gift is a ruby-colored dark ale. I don't know how they classify it, if at all, but it is definitely a pecialty beer. I detected juniper berries (I think) and rich dark-fruit malty overtones providing the sweetness to carry the alcohol (I'm guessing 7-8%), balanced by a just enough hop bitterness to keep it from being cloying... This beer had a lot of potential to be a one-pinter, given the fruity nose (from the dark malts and the juniper berries), but it was well-attenuated and finished much drier than I expected. This beer was like a juniper-cautious Alaskan Winter on steroids!

Friday, March 5, 2010

3/5/10 - Dry Hopping & Kegging


This weekend, we are officially "reintegrating" the guys who recently (Thanksgiving) returned from Afghanistan into the unit... I have missed these guys a great deal - first while they were deployed, and more recently as they resettled their lives upon their return. Out of respect for their space, and knowing firsthand the heightened sensitivity to all-things-military, no matter how well-intentioned, I have kept my distance for several months as they adjusted to life back home.

I brewed up a couple of batches of beer for the occasion - one a Classic American Pilsener that I brewed at the tail-end of last year, the other an American IPA which I repitched on the yeast from the BYO/BBR Collaborative Experiment on extract techniques... The yeast had crashed out well, and it was time to keg it up. Actually I should have kegged it up last weekend.

I took the day off to go in and do some admin prep for the drill, but I started my day in the shop taking care of this beer! Since I did not keg it last weekend, and I wanted to dry hop both beers (a little bit of noble hop character in the pilsener and a hefty hop nose in the IPA), I had to alter my technique a bit... I opted for a "hop tea" added to the keg prior to racking in the beer.

I was adding about 2 oz of hops to the pilsener, so I boiled 2 cups of water for them; since the IPA was getting closer to 4 oz, I boiled about a quart for them. While they boiled, I weighed and bagged up the hops - nice and loose with lots of 'swimming' room! After 10 minutes of boiling, I cut the flame and tossed in the hop bags, making sure that each bag was entirely saturated... When I wasn't stirring, I kept the lids on the pot in order to trap in most of the volatiles.

The liquid and saturated bags went into the sanitized kegs ahead of the beer, which I racked onto the bags and hop tea. I sealed up the kegs, and applied CO2 over-pressure to speed carbonate them in time for Sunday's picnic...