Thursday, August 6, 2015

Another BrewGarage Project

I blew my keg of Classic American Pilsner the other day, and I began to lament the impossibility of replacing it any time soon. It has been one of the hottest (and driest) summers on record here near Seattle, and lacking a fermentation chamber or truly practical space, brewing lagers is out of the question for the foreseeable future.

Or is it?

My beer fridge is set to normal refrigerator temps (around 34°F). I could raise that up I suppose, but that would affect other things (like having cold bottled beer or the hops stored in the freezer). My keezer is set at 48-50°F, which is a little on the low side, but doable. The problem there is that putting a fermenter in there either takes up keg space (again, less beer) on the floor, or requires jury-rigging on the compressor hump (in order to have airlock clearance).

However, I began to think I might be on to something with the keezer... What if there was a way to harness the cooling temps from it without taking up space inside it? Like some kind of heat exchanger? Based on that idea, I turned to Google.

I really could not find anybody doing anything quite like what I had in mind. I was picturing a copper manifold hanging against the wall of my keezer, circulating water from cooler or garbage can by using a pond pump; the fermenter would be immersed in the water within that cooler/garbage can. This would be a very low-tech/low-cost environmental control: by keeping a larger thermal mass at lagering temperatures, the beer temperature could be held more steady and cool enough to brew a lager.

The closest thing I could find was where James Spencer (@basicbrewing) discusses using a pond pump to circulate water from an ice bath (he calls it "Low-Tech Lagering" [Basic Brewing™ Low-Tech Lagering and Decoction Mashing DVD] or "Easy Lager Chilling"). I have a Ranco ETC controller, but didn't want to mess with the ice or frozen bottles.

Since I couldn't find anybody doing it the way I envisioned, I felt it was worthy of experimenting at the very least. My total cost turned out to be less than $50US.

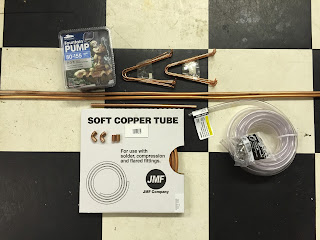
Parts:

  • cheap submersible pond pump (I went with the 155gal/hr model <$20US)
  • ~15' soft copper tubing, 3/8"OD
  • 2x 90° copper elbows
  • (1x copper slip connector - I spliced a 10' tubing section with a 5' section)
  • copper pipe hangers
  • 3/8"ID vinyl tubing
  • hose clamps
  • propane torch
  • water-soluble flux
  • silver (lead-free) solder
  • spring tubing bender
  • copper pipe/tubing cutter
  • hockey puck
  • fabrication mock-up/template
    When I am fabricating, I like to make mock-ups or templates on cardboard or on my work surface. I have found a few minutes building a template helps me visualize how the fabrication will unfold, allows me to troubleshoot a bit before I begin, and saves me time and materials in the long run since I invariably would screw something up without one. In this case, I took measurements inside my keezer to insure length/width fit, as well as the proper placement of the inlet/outlet tubes at the top. The dimensions of the main portion of the manifold are 24" wide x 15" tall, with all primary curves of 3" diameter.
      I straightened out my coil of copper (using the spring tubing bender). I began construction at the top of the copper manifold (bottom in the picture above), using the spring tubing bender to form my curves around my hockey puck; the hockey puck is a perfect form, since it is hard rubber and has a 3" diameter. That first 90° bend was no problem, but when I got to the first 180°, I hit my first snags...


      cheap pond pump, 3/8"OD soft copper tubing, 90° elbows, copper pipe hangers, 3/8"OD vinyl tubing, hose clamps

      Tools:


      propane torch, water-soluble flux, silver solder, spring tubing bender, copper pipe cutter, hockey puck, fabrication template


      First, (and I should have already figured this out, being a math teacher!) using a 3" form actually results in an overall diameter greater than 3"; my template was built with an OC/overall diameter of 3", but in reality I was going to gain 3/8" with each turn. This immediately messed up my project scale. Second, 3" is about the tightest inside diameter that I could bend with the spring tubing bender, and it was a HUGE pain to work the spring around the curve!

      I was able to overcome the second problem with sheer stubborn determination (and very sore fingers/hands the next day)... As far as the over-sized curves, I did some quick estimates towards the final project dimensions, did some measuring in my keezer, and initially decided to proceed and end up with a square-ish manifold. In the end, I was able to "overbend" the 180° curves to get back close to my original project dimensions; the cross tubing was not parallel or horizontal - not "pretty" - but that was fine with me... It goes inside the keezer where very few people will see it anyway! I added some rigidity to the manifold by soldering on copper pipe hangers. Then I took measurements with the manifold in place inside the keezer for proper inlet/outlet placement (getting them around the backs of the taps required careful placement).


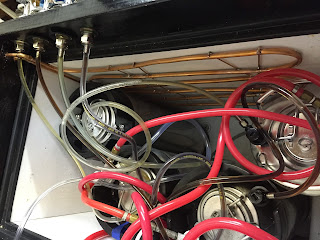
      It ended up fitting pretty well (and looks less ugly in the keezer). 


      Heat-exchange manifold installed in keezer

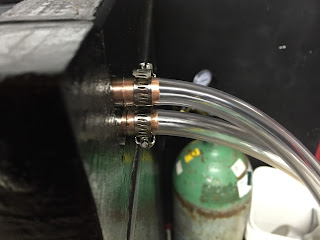
      inlet/outlet detail inside keezer

      inlet/outlet detail outside keezer


      I filled a 32 gal garbage can with 5 gallons of RO water and installed the pump. Once the tubing was all hooked up, I started running the system. The H2O temperature started at 68°F, and the garage temperature was about 69-70°F. The manifold cooled immediately upon installation (I guess that's the nature of a heat exchanger!), so I'm cautiously optimistic about the system's ability to cool and maintain steady temperatures. I will collect some data, and update the blog once I have real numbers. Once I have that data, I might hook up the Ranco controller to the pump...

      This is really just a temporary (quick/cheap) solution for maintaining lager brewing temperatures. Bigger projects I am planning include temperature-controlled fermentation chambers (heating and cooling) with Arduino/RasberryPi driven temperature control.
      Thursday, March 19, 2015

      "Found" Beer?

      Can you call something "found" if you never knew it was lost in the first place? It was there all along, after all.

      I've spent a few hours over the past couple of nights screwing around in the brew garage - listening to music, organizing small bits into storage drawers, putting away stuff that I finally got around cleaning... I even recorded a video for "Home Brew Wednesday" on YouTube (https://youtu.be/TfaZyKQWk6Y).

      I'm not sure what possessed me to move some stuff at the front of the shelf where I cellar beer, but I discovered a long-lost gem at the back: one of my first Rye Pale Ales (based on the Can You Brew It Terrapin Rye). That episode aired in the middle of 2010, and I ordered the ingredients from Northern Brewer on my lunch hour at work, so that had to be in May or June of 2010.

      I don't think I can adequately express in words the feelings I had when I made this discovery... Excitement? Elation? Anticipation? Amazement? Intellectually, I do know a couple of things about that discovery however... I loved that beer, and have loved it every time I have made it; and I was going to drink it. Soon.

      I was already set for that evening as far as beer intake goes. Plus, I wanted to set myself up right for this tasting: clean palate, note taking materials, proper chilling, etc. So I placed it in the laundry room fridge, careful not to disturb the yeast at the bottom of the bottle.

      It was remarkable how brilliant the beer appeared in the bottle: I could easily read 12 point print through the beer in the bottle! The ring of sediment at the bottom was further evidence of how time had cleared this beer. I went to bed longing to try this nearly-five-year-old beer! In fact, I dreamt about the tasting session - a surreal dream where several of us sampled the beer and discussed its merits and detractors...

      The next day, there was a break in the weather, and I opted for the responsible choice and began my evening by mowing our lawn for the first time this year... That 2010 Rye Pale would have to wait. And then I had to make dinner. It was beginning to feel like I would never get to the beer!

      With my tasting notebook and a purple fountain pen in hand, I finally settled in to pour my 2010 Terrapin Rye Pale clone at about 8:30 PM. I was excited and nervous at the same time! It was a great beer in its prime, but had it stood the test of time?

      Appearance:
      As previously mentioned, I could sense its brilliant clarity in the bottle - a careful decant preserved that. It poured a brilliant copper with a tall, white, rocky head that lasted and lasted - it simply would not dissipate. I'm sure the rye malt had something to do with that, and the fact that it had a good foam stand was a good indication that there was no contamination. The carbonation was lively, with tiny bubbles rising to the head. As I drank the beer, the head did not fade, and it left a heavy lacing on the glass.

      Aroma:
      Virtually no hop aroma remained - at least given the original hop schedule (over an ounce added at 10 minutes and flameout and 1.25 oz of Amarillo as a dry hop). There was a subtle spiciness in the nose - perhaps the rye, perhaps the Goldings or Fuggles hops? I picked up something else in the aroma, something elusive... I couldn't put my finger on it. The closest I could come was slightly vanilla-toffee, just a hint.

      Taste:
      The only hop character that remained was the overall bitterness - no definable hop character. In other words, I could no longer detect any of the distinct hop flavors: no Fugg

      le, no Goldings, no Cascade, no Amarillo - no identifiable hop character. There was bitterness to balance the malt, even after 5 years. The malt had definitely moved forward as the beer aged - it used to be a hop-forward ale, with a spicy-rye malt undertone.

      That ambiguous/fleeting aroma that I had a hard time naming was also present in the flavor, which is no surprise given how much smell factors into taste. I believe that aroma/flavor is oxidation-related, because I associate it most closely with bottled British ales, like those from Fuller's or Samuel Smith. It was a bit caramel-like - sort of toffee? It was not nearly as strong as in the aroma, but it was definitely there almost as a subtext... There was a bit of oxidative twang as well, but nowhere near enough to be unpleasant.

      Mouthfeel:
      I was pleased to find that the beer had not thinned over the half decade it cellared in the garage. I do believe that all of the hop character dropping out of the beer did affect the mouthfeel, because when it was fresh, between the rye and the hops, it had a strong medium mouthfeel, falling just short of chewy. Over time, it had now settled into the medium-light mouthfeel range, and the carbonation helped contribute to that as well.

      Overall:
      Wow. My excitement at the discovery of this beer was tempered with a heavy dose of apprehension: time is the enemy. Oxygen, contamination, temperature swings - any number of variables could have crushed this beer. It is nowhere near the original beer, but it held up OK. It was enjoyable. Not as zippy as the original, it did have the pleasant oxidative character I like in bottled imported British ales. The clarity, head retention, and lacing were amazing. I kind of wish I had discovered this bottle 2-3 years ago, because I can imagine a happy medium between the original beer and the 5-year beer, and in my mind's eye, that seems amazing!

      "Lost" beer? "Found" beer? It is gone forever now. But the record of its tasting will live on...

      Wednesday, March 11, 2015

      Time for a Brew Kettle Modification?


      SS Brewtech Trub Dam
      While reading a brewing magazine recently, I saw SS Brewtech's Trub Dam. I currently have a copper tube, perforated with holes and covered with stainless steel braid; it is prone to clogging with
      My current kettle screen
      trub and protein break... at the very least, it slows WAAAAAY
      down towards the end of the draining process.

      1" copper pipe, flattened/notched 3/4" copper coupling, 90° elbow
      I sketched up a similar trub dam which used copper fittings. Some cutting, simple soldering - it was possible. I decided it was at least worth a try.

      Materials:
      1/2" x 1/2" threaded adapter
      1/2" copper pipe (1")
      1/2" copper 90° elbow
      3/4" copper coupling
      1/2" copper tube strap


      • I soldered the copper pipe section into the threaded adapter. This gets screwed directly to the threaded valve on the kettle. 
      • I had hoped to find some copper flashing for the main portion of the dam/diverter, but I could not source any locally. I got creative and cut the 3/4" copper coupling lengthwise, then bent it open and flattened it out; I notched it about 1/2" and bent that up for a soldering surface to connect to the 90° elbow.
      • I worked the 1/2" copper tube strap into a "C" shape to match the width of the flattened coupling. I filled the screw holes with solder, then soldered that 90° to the flattened coupling as the diverter on the dam. I trimmed the base to fit

      1/2" copper tube strap, soldered base/90° elbow
      base - showing uptake gap
      1/2" copper tube strap, solder-filled


      diverter/dam complete

      I'm hoping that I can get the wort going in a "whirlpool" as I chill it, and use this new diverter/dam fitting to keep the trub and hop mass out of my wort as I drain it into the carboy...

      Monday, March 2, 2015

      Brew Day: Two Dry Stouts!

      With Saint Patrick's Day a couple of short weeks away, I find myself without anything appropriate on tap! I always try to have something dark and roasty on - either a stout or a porter, o
      r both! I am not the type who thinks of darker beers as winter seasonals... I can drink a porter anytime, and a dry stout functions just fine as a "lawnmower beer" for me.
      Sláinte Mhaith - my dry stout

      I have a standby (award winning) dry stout recipe that I brew at least 2-3 times per year. It is consistent and a pleaser for any fan of the style. I call it 'Sláinte Mhaith' (SLAHN-cha wa - Irish Gaelic for 'Good Health'). It is really just the recipe from Brewing Classic Styles (http://www.amazon.com/Brewing-Classic-Styles-Winning-Recipes/dp/0937381926) by Jamil Zainasheff (@mrmalty) and John Palmer with whatever uniqueness my system/process lends:
      70% Maris Otter British Pale Malt
      20% Flaked Barley
      10% Roasted Barley
      I use WY1098 British Ale as my yeast...

      I have always loved stout - I was among the first people I knew to like Guinness (I will not admit how early). Like many brewers, I originally fell prey to the "more is better" thinking when formulating my stout recipes. When I sat down to write this blog entry, I looked back through my recipe binders and brew logs... There were TEN stout recipes (American and dry). Each was decent - I don't believe I ever made a terrible stout (I have made a few terrible beers though). But none of them was what I was looking for - thus the ten different recipes, none brewed a second time.

      Then I listened to Jamil's Dry Stout  episode on The Jamil Show (http://thebrewingnetwork.com/shows/The-Jamil-Show) - the original one, not the Brewing with Style newer one... He talked about the simplicity of classic Dry Irish Stout. I brewed that recipe, which he later included in the book referenced above: it was exactly what I had been pursuing! I have been brewing that exclusively as my dry stout recipe ever since.

      2015. The year is young, and I have been immersing myself in brewing media: Basic Brewing Radio/Video, the beer engineChop & Brew, Brewing Network... Was it time to brew a different stout? Should I put more than one stout on tap? An episode of Chop & Brew and an entry in the beer engine blog featured a Beamish-inspired dry stout - I had tried clones of Beamish in the past, but they had fallen short. This recipe, and the subsequent tasting on Chop & Brew, seemed compelling.

      I talked through my ideas with my local brewery's tasting room manager (and former student), and he mentioned he had a nitro system that was not currently in use. What?! He offered it to me on loan! That iced it - I was going to brew both, and serve them both on nitrogen!

      Brewed and ready for March 17th. No green beer here - only proper stout!

      --------------------------------------------------------------------------
      Slainte Mhaith
      --------------------------------------------------------------------------

      Category: Stout
                      Subcategory: Dry Stout
                      Recipe Type: All Grain
                       Batch Size: 5.5 gal
                    Volume Boiled: 7 gal
                  Mash Efficiency: 70 %
              Total Grain/Extract: 10.00 lbs
                       Total Hops: 2.0 oz

      Ingredients
      --------------------------------------------------------------------------
                  7 lbs Maris Otter Pale
                  1 lbs Black Roasted Barley
                  2 lbs Barley (Pregelatinized Flakes)
                    **2 oz East Kent Goldings (Whole, 5.00 %AA) boiled 60 minutes.
                 Yeast: Wyeast 1028 London Ale

      Notes
      --------------------------------------------------------------------------
      Mash @ 152°

      Vital Statistics
      --------------------------------------------------------------------------
       Original Gravity: 1.044
       Terminal Gravity: 1.009
                  Color: 27.47 SRM
             Bitterness: 41.8 IBU
      Alcohol (%volume): 4.5 %


      ** I actually shifted 10% of the hop bill to 10 minutes to match the Beamish-inspired recipe (for analoous comparison purposes)

      --------------------------------------------------------------------------
      Squeamish
      --------------------------------------------------------------------------

                         Category: Stout
                      Subcategory: Dry Stout
                      Recipe Type: All Grain
                       Batch Size: 5.5 gal
                    Volume Boiled: 6.5 gal
                  Mash Efficiency: 72 %
              Total Grain/Extract: 9.25 lbs
                       Total Hops: 1.9 oz

      Ingredients
      --------------------------------------------------------------------------
                  7 lbs Maris Otter Pale
                  1 lbs Malted Wheat
               0.75 lbs Black Roasted Barley
                0.5 lbs American Chocolate Malt
                 0.6 oz East Kent Goldings (Pellets, 5.00 %AA) boiled 60 minutes.
                 0.4 oz Perle (Whole, 8.25 %AA) boiled 60 minutes.
                 0.5 oz Hallertau (Whole, 4.50 %AA) boiled 60 minutes.
                 0.2 oz East Kent Goldings (Pellets, 5.00 %AA) boiled 10 minutes.
                 0.1 oz Perle (Whole, 8.25 %AA) boiled 10 minutes.
                0.15 oz Hallertau (Whole, 4.50 %AA) boiled 10 minutes.
                 Yeast: Wyeast 1098 British Ale

      Notes
      --------------------------------------------------------------------------
      Mash @ 152°

      Vital Statistics
      --------------------------------------------------------------------------
       Original Gravity: 1.042
       Terminal Gravity: 1.008
                  Color: 28.44 SRM
             Bitterness: 39.1 IBU
      Alcohol (%volume): 4.3 %

      Monday, February 23, 2015

      Reclamation Project (Hops and Our Garden)

      Our garden has suffered neglect for at least two years. When we first moved into this house, we were excited at the prospect of so much space: more yard, more garage, more storage... We wanted to put the garden in the sunniest part of the yard, but it had the worst soil. In order to take advantage of the sun, we had to build raised beds.

      After constructing four large (72 square feet each) beds, we soon discovered all the critters were drawn out of the woods by our new vegetation: the deer and rabbits had their way with our produce. Next came the fence!

      This was an unexpected expense, so I built it on the cheap... I ended up using "cherry" landscaping timbers instead of decent treated posts, along with 60 inch "rabbit" wire. I soon realized that the deer could easily make it over the 5 foot wire fencing, so I added two rows of single-strand aluminum electric fence wire to extend the fence height to 7 feet. The posts made it five years before the first one rotted and failed. One-by-one, a handful of other posts began leaning. The sagging fence was the final straw - it was time to fix up the eyesore that was once our garden.

      Of all the victims of our neglect, the saddest to me was my burgeoning hop collection. Two years ago, I harvested close to 10 lbs, of hops (wet). I'm pretty sure that was the last time I harvested, and did nothing in the way of maintenance since: no pruning back, no fertilizing, no supplemental watering... It's a bit depressing to think that I had gone from 10 lbs. from 13 varieties to completely ignoring them altogether.

      As I prepped to replace the fence and shape up the garden, I eyed my pots of hops. The pots are arranged alphabetically, and the first in the bunch was Cascade: a complete loss - rotted out by poor drainage (and a pot that had apparently been dumped then righted). It got better after that, and despite my laziness, the rhizomes themselves were thriving - completely filling the pots (especially the Cluster).

      I trimmed things back, saving a handful of starter rhizomes for friends before carefully repotting. This is my 2nd, and in a couple of cases 3rd, division and repotting. Recommitted to their care, I am hopeful about this years crop.

      Now I need to get back to work on the fence and reclaiming the rest of the garden!

      Tuesday, February 17, 2015

      A Return to Roots

      At least twice each year, my military buddies (and a few others) get together for a group brew day... This usually happens on Veteran's Day and President's Day weekend, when there is an extra day off and we can manage a guilt-free day away from family commitments.


      I always host. I always prepare the main dish we'll be eating during the day. I always have fun, but usually have much less time for socializing as I juggle an all-grain batch, food, and other hosting duties. I'm usually still finishing my brew day after everybody else has left. And then I'm cleaning up in the dark.


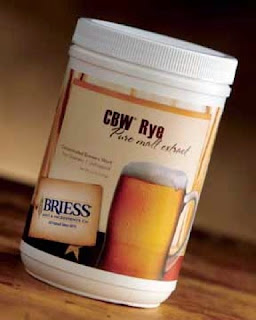
      Briess CBW Rye Malt SyrupAt my local homebrew shop (Olympic Brewing), I noticed Briess liquid rye malt extract for the first time... I'm a sucker for rye! I'll try anything with the word "rye" in it. I grabbed 3 Kg with the intention of trying it out soon...


      Another thing I really love is drafting up recipes. My recipe binder is probably at least 3 times s thick as my brewing log! So of course, after buying the rye malt syrup I took a couple of shots at rye recipes.


      Around the same time, I was making final plans for the group brew day... A light bulb went off: why not brew extract with grains? That simple decision was quite liberating actually. I seldom brew extract anymore - usually at least half of my fermentables come from a mash (partial mash); occasionally I'll brew quick batches of extract to fill keg gaps between all-grain brews (especially in the winter).


      It would be nice to have a bit more social time when everybody was over. Cutting liquor heating, mash, and sparge time out of my brew day might mean hanging out more than flitting about. My brew day would be synched with everybody else's (who mostly brew extract batches). Plus, it was like a step back in time - a return to my roots - to what got me hooked in the first place...


      I flipped back to my earliest recipes in my brew logs. It was a trip down memory lane. Although I could no longer bring to mind tasting memories of most of those early brews, I had my notes. And I remembered little associations for every single one: the ones I brewed for my wife, the bad batches, the hits and misses. The "beginner" shined through: other people's recipes (Papazian, homebrew shop, etc.), odd combinations of ingredients, weird formulations, kitchen sink brews...


      My recipe formulation has come a long way... Thanks in part to Brewing Classic Styles, I can quickly formulate a beer that falls where I want it. Experience with various ingredients - different grains and hops - has helped me with what fits best and where. My extract batches have benefited in the same way - I have a few that I stick with because they yield good results with minimal fussing: American Pale, British Bitter, and Bavarian Hefeweizen (the first two are usually made to build up a good supply of healthy yeast).


      Although I was going to make the move to simplicity for the big brew day, I did step it up from my straightforward  stand-by extract brews... I opted for a more sessionable IPA: on the low end of ABV for the style, with the bulk of the hopping as late additions. The liquid rye would provide the bulk of the fermentables, along with a little dry malt extract. I also decided to do a mini-mash of 2-row along with a bit of chocolate malt (concurrent with my main boil to preserve the time efficiency) for a bit of extra character and color.


      The brew day went great. I had more time to talk and hang out, as I had anticipated. There was much less cleanup for me. I actually had time with my family at the end of the brew day.


      Within 12 hours, my beer was off and going like gangbusters in the carboy. Time will tell how the beer actually turns out, but the process was fun, and I'm sure that the end result will be enjoyable one way or another as well.

      --------------------------------------------------------------------------
      Recipe: Rye't On
      --------------------------------------------------------------------------

      General
      --------------------------------------------------------------------------
      Category: India Pale Ale (IPA)
      Subcategory: American IPA
      Recipe Type: Extract
      Batch Size: 6 gal
      Volume Boiled: 7 gal
      Mash Efficiency: 72 %
      Total Grain/Extract: 9.11 lbs
      Total Hops: 4.6 oz
      Calories (12 fl. oz.): 185.5

      Ingredients
      --------------------------------------------------------------------------
      0.5 lbs 2-Row Brewers Malt
      0.25 lbs 2-Row Chocolate Malt
      6.6 lbs CBW® Rye Liquid (Malt Extract)
      1.76 lbs Dry Extra Light Extract
      0.6 oz Bravo (Whole, 15.50 %AA) boiled 90 minutes.
      0.6 oz Magnum (Whole, 14.50 %AA) boiled 15 minutes.
      0.7 oz Chinook (Whole, 13.00 %AA) boiled 5 minutes.
      0.25 oz Magnum (Whole, 14.50 %AA) boiled 5 minutes.
      1.3 oz Chinook (Pellets, 13.00 %AA) added to Secondary.
      0.6 oz Citra (Pellets, 12.00 %AA) added to Secondary.
      0.6 oz Magnum (Pellets, 14.50 %AA) added to Secondary.
      Yeast: Wyeast 1056 American Ale

      Notes
      --------------------------------------------------------------------------
      -Mini-mash 2-row and chocolate malt @152°

      -Dry hop 5 days

      Vital Statistics
      --------------------------------------------------------------------------
      Original Gravity: 1.056
      Terminal Gravity: 1.012
      Color: 16.13 SRM
      Bitterness: 47.7 IBU
      Alcohol (%volume): 5.8 %
      [recipe created/calculated using Beer Tools]